Sunday, March 2, 2008

Easter Tablescapes 2008

To view details of our 2009 Easter Tablescape, pictured above, click here.
See below for our 2008 tablescape.


Easter Tablescape Ideas - Spring 2008


The above Easter Tablescape features pretty pink, yellow, and green pastels with small highlights of baby blue.


Gingham always reminds me of the start of spring and summer.
Yellow, pink, and green gingham cloths were layered atop a plain white tablecloth. Yellow and pink gingham napkins were also used.


Cottage chic pastry stands were topped with birds nests filled with sugared bird eggs in matching shades of pink, blue, and green. The birds nests were also placed a top a layer of Spanish moss while faux spring flowers were tucked into the moss to add more touches of color.


I love how these sugared birds' eggs glisten in the light or sun.


So pretty - and the best part, these eggs can be stored away and used from year to year.


A feather wreath was placed upon a shabby chic candelabra.
To add more color to the basic white pillar candle, flowers and a little green bird were tucked into the feather wreath surrounding the candle.


These adorable moss covered bunny rabbits were also added to the base of this spring centerpiece. If you'd like to extend this centerpiece beyond the Easter holiday merely remove the bunny rabbits after Easter Sunday.


Spanish moss is placed around the bunny rabbits.


In addition to the Spanish moss, bright green moss layers and spring flowers are also integrated to add more volume to the base of the tablescape.
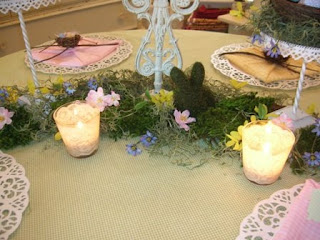


White lace votives also add a touch of glow to this spring centerpiece.


The Easter place settings consist of white shabby chic charger plates, gingham napkins, and vine nest favors. Cute green and white polka dot place cards are also being used.


The vine nest favors were first filled with 2-3 small white feathers.
Chocolate bird eggs were then added to complete this perfectly tasty take-home favor.


Other Variations on this Easter Centerpiece:


In the above Eater centerpiece, the shabby chic candelabra was replaced with a spring decorated tree.


The tree was topped with a pretty pink birdie.
Feathers, spring flowers, and sugared Easter eggs were then tucked into the branches of the tree.


In the above spring tablescape, another type of tree was used.


This tree was dressed with faux flowers, glittery eggs, and five inch bird's nests filled with additional glittery eggs.


For another variation of the spring tablescape, we topped a feather wreath with a decorative bird's nest. This bird's nest was then filled with chocolate birds eggs. Another yummy treat for guests' to take-away.


If you'd like to guide where you're guests will be seated, spring place cards can easily be integrated into any of these place settings.


In the above place setting, pretty shabby chic luncheon plates and our shabby chic charger plates are also highlighted.

Easter Tablescape Ingredients:
Pink Shabby Chic Luncheon Plates: Available from Crossroads Cottage
Shabby Chic Pastry Stands: Available from Crossroads Cottage

or white lace inspired Cake Stands
Easter Trees:


Easter Egg Twig Tree
Other Recommended Easter Tablecloths/Linens:


Eggs Napkins & Napkin Rings
Chocolate Birds Eggs: Available from Cadbury or Hersheys

Sugared Birds Eggs: I purchased at TJ Maxx HomeGoods
Faux Spring Flowers: I purchased at Michael's, flowers were easily pulled off larger/longer branches
Feather Wreaths: I purchased at Flower Factory - also available at Craft Stores. Also available online.
Feathers: Available in craft stores such as Michael's or Hobby Lobby
Spanish Moss: I purchased at Michael's. Also available online.
Green Moss: I purchased at Michaels
Pink and Green Craft Birdies: Available at Michaels
White Pillar Candle: Available at Hobby Lobby
White Shabby Chic Candlebra: I purchased at Hobby Lobby, Summer 2007

For other recommended Easter products, please visit here.

Napkin Fold Pictured in Placesettings:

Start out with a square napkin. Fold each corner to the exact center until you have a smaller square. Fold each corner into the center once again until the square is smaller still. Place napkin atop plate and add vine nest favor.

Looking for other spring tablescape ideas?
I recently purchased the book, Table Inspirations: Stylish Ideas for Elegant Entertaining by Emily Chalmers. This book also has some beutifully unique Easter Centerpiece ideas. This book is available at Barnes & Nobles.

Wednesday, February 27, 2008

Fabulous Finds: Delicious Dessert Dinner Party Products


Anyone who really knows me knows that I love dessert. Yes, I admit it, I have a sweet tooth, or two - okay, maybe all my teeth are sweet teeth. :-) Truth be told, I love dessert even more than the meal like 95% of the time. In fact, I've been known to take really small servings of the actual meal only so I can overindulge on what is to me the best party of any meal - a sweet, and hopefully dark-chocolatey, treat! So, it wouldn't suprise most that upon seeing the above napkins at Plum Party recently, my mouth instantly started watering. The petit four pictured does look good enough to eat, doesn't it? (I only wish I could get mine to turn out as gorgeous!) So much so that I have a craving to purchase these napkins. I even have a party brewing in my head. A party centered around dessert - A Delicious Dessert Dinner Party! (Of course, the whole point of this party would be to forgo the dinner and move right along to dessert!) This event would be a wonderful one just for you and your girl friends. Have each friend bring their own favorite tempting treat and completely cover your dining room table with them. No need to sit down at the table as you'll be munching on delicacies all evening.


Ingredients for a 'Delicious Dessert Dinner Party':

* Weeks ahead of schedule mail invitations to your friends. To get them really excited about the upcoming festivities, mail them cute menu card invitations. On the inside of the card print the details of the evening instructing each guest to bring their favorite dessert to share on their favorite serving dish. You may also suggest that they bring recipe cards of the dessert along with them to share with party guests. This will get their mouths watering well before the party even begins.

* Of course you'll want to purchase the above napkins to go along with your themed party.

* If these napkins are incorporated you'll already have a built-in color scheme - raspberry pink and chocolate brown. These colors mixed together almost look good enough to eat!

* Before guest's arrive drape dining room table with layers of raspberry and chocolate colored fabrics. Just purchase several yards from your local fabric store. Don't know how to sew, no problem! When draping fabric you are easily able to hide seams or frayed edges. To create several different layers for your guest's dessert dishes, before draping fabric, scatter varying heights of boxes or books on table. Once finished, drape fabric over these items and guests won't know that you're actually hiding ugly boxes and telephone books!

* For the evening's entertainment, rent the movie Chocolat. Before guest's arrive be sure to have plenty of throw pillows arranged on the floor in the room where you will be watching the movie. Also purchase the large boxes of candy (similar to the size you buy in movie theatres - most drug or Target type stores carry these) and scatter those around the room. These boxes of candies along with plenty of drinks and maybe even large popcorn themed tubs filled with chocolate covered caramel corn will help make your dessert themed party a huge hit.

* For favors your guests can walk away with all of the recipes cards that have been brought. In addition, these Admit One Chocolates would also make a great take-away gift and memorable closure to the evening.

The end! (I'm now off to find my own dessert!)

Tuesday, February 19, 2008

Fabulous Find: Unique Molded Cake Pans

Giant Cupcake Cake Pan

While recently browsing the web, I ran across this ultra-fun giant cupcake cake pan. What child, or adult for that matter, wouldn't love being presented with this gigantic cupcake instead of a traditional sheet cake? It will surely put a grin on the guest of honor as well as all of your guest's faces. It's even large enough that it could be your tablescape centerpiece - just place the decorated cupcake on a stand as they've done in the photo! Cupcake measures: 15½" x 8¼" x 3¾". Not sure how to carry the cupcake theme through your entire party? As stated above, use this cupcake cake as your centerpiece. Scatter cake decorations, such as the fun sugared confetti pictured above, on your tabletop. For place cards, place an individual cupcake in the center of each placesetting and insert these unique cupcake toppers. Need something to keep your little guests' busy? Perhaps have them try their hand at decorating the large cupcake cake. Or, if the thought of that (or the mess they may create) frightens you - start small and have each child decorate an individual cupcake. Give a prize for the best decorated cupcakes - prettiest, most unique, scariest, etc.!


Lego Cake

Speaking of unique birthday cake ideas, I thought the above giganto cupcake cake could not be beat. That was until I ran across this very fun lego cake pan. This would also be the perfect cake for a children's birthday party. Carry the theme all the way through and make the entire party lego themed! Use the lego cake as your centerpiece (build your own fun cake plate/stand out of legos), scatter lego pieces on the tabletop, and even make cool lego designs and prop placecards on or against them. If you are really creative, I bet you could even make lego napkin rings! Just in case the kids get bored, set up lego stations around your house to keep them busy and perhaps give a prize to the child who creates the most unique lego creation. Finally, as parting gifts, give out mini boxes of legos. Lego cake is available at bettycrocker.com.

With all this talk of cake, my mouth is really watering for a nice little bite. I wish I could run my finger over the blue icing above and actually get a taste! Now, that would be nice! As my stomach is now growling, I should be running along. Please return next Tuesday for our next Fabuous Find(s)!

Wednesday, February 13, 2008

Item of the Week: Cupcake Topper and other Party Items


I thought I'd start a new feature on my blog each week - an "Item of the Week" feature highlighting a new, or perhaps just a favorite, item available on my site. My favorite item this week is something that I've just finished handcrafting this weekend. The very cool cupcake toppers pictured above. These pinwheel cupcake toppers come in sets of 6 (we also have some larger sets available on our site) and are handcrafted in my cottage. They would certainly be a special highlight at any children's birthday party. Especially for those of us who are technically challenged when it comes to decorating with icing. (Yes, I am challenged - I admit it - I have no talent even though my parents owned a bakery when I was young. If you are interested in that random rambling see the bottom of the post.) Even if you can barely ice a cupcake and even if the final product is lopsided, no one will notice. Your party guests will only notice these cute pinwheel cupcake toppers. We even have sets available, such as the one pictured above, that include a place card attachment. Just inscribe your guests' names on the card and place a cupcake in the middle of each placesetting on the table. This will certainly help avoid the fighting that goes on when kids are permitted to choose their own places - especially at a birthday party. (I have 12 stitches in my forehead to prove that kids do argue over seats - yet another rambling - see below.) Or, place a dozen or so cupcakes with toppers inserted on several varying heights of cake stands (or whatever else you have on hand - don't have cake stands, cover boxes or books with tablecloths or napkins and then place cupcakes on top) in the center of your table and these would make a unique centerpiece or the start of a unqiue children's birthday party tablescape. In place of a name, inscribe "Happy Birthday" on the card attachment.

I am still in the process of handcrafting these cupcake topper place cards (I have a stack of cardstock about a foot tall just waiting to turn into pinwheels), but as more become available, they will be added to the Fabulous Festivities area of my site. In the meantime, if you have a kid's birthday party coming up and you are going for a particular theme or color, just e-mail me at shana@crossroadscottage.biz and I'll certainly see what I can do to create something amazing for your next birthday party or event.

In addition to the pinwheel cupcake toppers, pictured above, we also have matching pinwheel napkin rings. These can either be used as place cards, or you can insribe a special message on each. Even better, if the napkin rings aren't destroyed at the party or taken home as mementos of the evening, they are sturdy enough to be re-used. The place cards can be removed and a new card can be slid on the brad attachment on tha back. (Contact me for place card replacements.)

Who says that the top of your gift has to display a bow?! If you are tired of placing the same old bows, like I am, a top your presents, we've also created unique matching gift toppers/attachments. They are also - surprise, surpise - pinwheels. The back of each pinwheel contains glue dots so the pinwheels can easily be attached to the top of your gift. In addition to the glue dots, the brads on the back can also be used to wrap around gift bag handles. This works especially well with our smaller pinwheel gift toppers. And if things couldn't get any better, some of our gift toppers also contain gift tags so purchasing a card is not even necessary!


Random Rambling #1: My inemptness at decorating with icing!
Let's start at the very beginning (a very good place to start). When I was practically a baby, my parent's owned a bakery in Chicago. It was a pretty well known neighborhood bakery and I literally grew up there as my mom also helped out my dad with the business. Of course they did the traditional donuts, breads, cakes, etc., but my dad was also pretty good at the cake decorating and they decorated many a wedding cake (my dad even made and decorated my parent's own wedding cake). Even though they sold the bakery before I reached school age, my dad still stayed in the baking industry and when I had show and tell in kindergarden my dad came in and showed everyone how to make an icing rose infront of the class. I think he even had me try my hand at it as well. I don't remember exactly how my rose turned out that day, but it was probably pretty bad - considering my age. :-) Well, 4 years ago I was pretty bored with my life and I decided that I needed a hobby so I decided to go to Hobby Lobby to try to get one (Where else would one go?). I saw the cake decorating classes sign and decided to sign up with a coworker. I get to class and I'm all excited. After all, I should probably be pretty good at this since I may have inherited some of my dad's talent, or so I thought at the time. By the first class I learned that I was so wrong. I can be clumsy and as it turns out I'm even more so when it comes to doing anything with icing. My coworker, on the other hand, ended up being great - every Monday morning she would even try to give me lessons before our work day started. Despite the fact that I was very pathetic at it, I decided to continue on to Wilton II classes - partly because my coworker loved it and wanted to continue, but mostly because I had invested quite a bit of money in all of the cake decorating supplies at that point (everything from the Wilton pans to the tips to the turntable, etc - yeah, you ever wander why the classes are so cheap? It's because you literally have to buy hundreds of dollars of supplies at their store to complete them. ;-) ). To draw this rambling to an end, I have an entire container of cake decorating supplies in my closet that hasn't been touched since the classes ended. Every once in a while I tell myself that I should put them to good use and then I remember how pathetic most of my creations turned out. And yes, my dad did not pass down his cake decorating gene to me!
Random Rambling #2: How I got 12 stitches in my forehead and 6 in my chin in 1 week!
It was a Sunday afternoon and I was all dressed in my Sunday pretties. I still remember the green puffy dress I had worn to church that morning. I must have been 3-4 at the time. My mom calls me and my older sister and younger brother into the dining room for Sunday lunch. I am too young to totally remember the happenings back then but for some reason there was china on the table - not sure if we always ate on china on Sundays or if this happened to be a special occasion, but nonetheless, it was there. My younger brother and I go to argue over which place we are going to sit at and while doing so I must have slipped and grabbed onto the china plate on the table to try to catch myself. And guess where it went? Straight into my forehead and it wasn't a pretty site. Needless to say my parents rushed me to the emergency room, with blood all down my pretty dress, and as it turned out I needed 12 stitches. Graphic content: The plate even went deep enough that it went through to the bone between my eyes and a plastic surgeon had to do 6 stitches underneath and 6 on top. Anyway, I got over the experience as soon as I saw the tootsie roll lollipop bouquet that I was presented with upon departure. And nope, the story doesn't end there. Three or four days later I'm leaving to go outside, following my sister along the way, and I trip going down the cement stairs. And, yes I busted open my chin which lead to another emergency room visit and 6 more stitches. If I remember the story correctly, it was a Catholic hospital and the nuns questioned my parents about child abuse since it was our second visit that week. Their response must have just been that they had a very clumsy daughter - me. (Now, you are probably not surprised at all that I can't decorate cakes - and yes, my nickname is still clumsy.) And no, I was not tramatized at all by these 2 hospital visits in a week - why? Cause the nurses presented me with a second tootsie roll lollipop bouquet the second visit as well. In fact, I can still vividly remember going home and sitting there with a huge bandage on my forehead and a huge bandage on my chin, sucking away on my tootsie roll lollipop! I guess I must have loved my sweets even back then! :-) And in case you are wandering my stitches did not end with that second episode. When I was in third grade I also got stiches in the back of my head and a concussion. I'll leave that story for another day, but in the interim I'll just hint that my 3rd, and final, round of stitches was the result of a rainy day, my grandma's rock patio backyard, and a tomato cage (I still don't think my parents know about this third part!). Interested now?


Wednesday, January 30, 2008

Valentine's Day Tablescape Crafts

My latest issue of Better Homes and Gardens arrived last week and I've finally had a chance to browse through the pages. They had some great Valentine's Day ideas in the magazine and even more wonderful Valentine's day crafts, treats, and decor ideas on line. I loved them so much that I thought that I'd pass some of my favorites along. ~ Shana
***
I just adore the above wreath. This would make a great family project for a cold winter weekend day. I especially love how they've hung this wreath over the side of a dinner chair. The only thing better than one of these hung over a chair would be a wreath hung over each of the chairs at your tablescape.


And, how cute is the above? A bouquet of lollipop heart treats! Just line a few cups filled with these unique Valentine's day treats down the center of your table. After your event, guests can then walk away with these adorable, and tasty, items as favors.


I love the use of colors in this tablescape. It is fun and romantic at the same time. The fluorescent pinks and reds mixed with the yellow roses are certainly nontraditional, but at the same time so unforgettable! And the paper cones (filled with chocolates) propped in champagne glasses is another great idea!


Now, I've been known to wrap ribbon around cupcakes, but I typically ice mine. After this photo, I've realized that icing really isn't necessary! Plain powdered sugar, or even cocoa, seems to do and creates a wonderfully simple look. And there is a great benefit as well: less sugar and calories! :-) Just place a batch of the above on differing heights of cake stands and you are good to go for a centerpiece!


Looking for more fabulous finds for your Valentine's tablescape? I have more available
here.

Friday, January 25, 2008

Fondue Birthday Party!


For those of you who guessed 'Fondue' as the answer to the question posed on my previous post, you are correct!
* * *
As promised, I'm delighted to share my husband's birthday celebration. I made him the above birthday party hat. I almost inscribed 'Birthday Boy' on the hat instead of 'Happy Birthday'. Not sure he would have liked that. :-)


I carried over the pinwheel idea from my January tablescape, but I added a little twist. Instead of making pinwheel napkin holders, I made pinwheel chairback place cards to tie around our dinner chairs. Although, once I got them on the chairs, I wished that I had made them larger - by then it was too late to turn back as I was out of coordinating paper so the above just had to do. I still think it is a fun and festive look. Especially with the green and white gingham ribbon.


Yet another view of the place card chairback ties.
Above is a full view of the tablescape. It's simplistic but festive. I absolutely love these sheer gingham tablecloths for birthday parties. I layered two different colors of these sheer cloths, yellow and lime green, atop a white polyester tablecloth. I also have a few sets of sheer napkins - I chose the yellow sheer napkins for this tablescape. And instead of purchasing some fancy floral centerpiece, I decided to use Roger's presents as the focal piece of the table.


Instead of traditional bows on the gifts, I adhered differing sizes of
pinwheels. This was a really inexpensive alternative to large pre-made bows. These, as well as other pinwheels, are available for purchase on my site.


The placesettings featured my favorite
shabby chic lace chargers, the sheer yellow napkins, with pinwheel napkin rings, and of course the fun ric rac paper party hats described earlier.


The tablescape looked a little sparse after adding the placesettings and gifts so I made a few extra
pinwheels to scatter on the table. If you'd like to replicate this fun and festive birthday tablescape, I'd recommend scattering even more pinwheels. The more the better.

Here is a close-up of the largest pinwheel.
I especially love the dots on this particular paper - so festive!


Now to a close-up on his gifts. A few years ago, I'd seen the above wrapping technique in either a Martha Stewart magazine or a Real Simple magazine article. I've always wanted to try it out and since thin (1/4" width) spools of ribbon from Michaels were on sale this week (Woohoo - Boy, did I luck out!), I thought Roger's birthday would be the perfect time to give this technique a try. I purchased white kraft paper (also from Michaels - a huge roll for like $4) and 6 colors of fun and festive ribbon (they were on sale - 3 spools, 10 yards each for $1). The technique is simple. Just tie the ribbon onto the wrapped package. I used 4 different colors on each package, 2 ribbons per color - 1 of each color tied vertically and 1 of each color tied horizontally. Make sure you always tie the end of the ribbon on what will be the bottom of the package. That way the top looks all neat and tidy - and perfect for a bow, or pinwheel. It does take quite a bit of ribbon, but the look is so much more creative than just traditional paper. Plus, the ribbon can be reused as it will easily slide off the gifts during gift opening time!


After all the gifts were open, it was time to move onto dinner. I had purchased all of the supplies for a complete fondue meal. To keep the table festive, I reused some of the exhisting pinwheels to scatter around our serving bowls and dress up the table a bit for our meal.
Suggestion: For your party, keep the gift opening for after the meal; that way your table remains festive the entire dinner. Of course, I couldn't do that b/c my gifts were necessary for the meal. :-)


We started out with a basic cheddar cheese fondue. (See bottom of this post for recipe.) The cheese is just beginning to melt in the above photo. We dipped cauliflower, green apples, and french bread into the very yummy melted cheese.


After we were done with the cheese fondue, we moved onto the broth (meat and veggie cooking) fondue recipe. I found a recipe for Coq Au Vin - which is a burgundy broth fondue similar to the one served at The Melting Pot. We cooked chicken, pork, beef, and shrimp in this broth. Also, very tasty. We also dipped the meat in the above sauces (on Roger's new fondue plates). Sour Cream, lemon butter, terriyaki, and garlic, lemon, pepper sauce. Oh, and I almost forget the veggies - red potatoes, broccoli, and mushrooms.

Oh yes, and if we weren't stuffed enough. I had also prepared the above dessert. Roger loves all puddings and custards so I made a layered chocolate eclair cake. Which leads me to the third dessert disaster of the month. (To recap: #1 Roger's birthday cake for me which turned out yummy, but very lopsided. #2 My cherry crisp dessert for my sister's birthday which turned out yummy and pretty, but almost became a disaster when the candles melted in the - right out of the oven - crisp!) Now #3. I went to make this dessert the night before and I it turned out that I had purchased the wrong pudding mixes. It called for plain vanilla pudding and I had purchased banana cream. (Major oops!). By the time I started making the dessert it was getting late and I was getting tired and the thought of going outside, in the cold, for yet another grocery run just did not appeal to me. So, I told myself that everything would be okay - Roger likes bananas and I know that he likes banana pudding and this recipe was just basically just pudding and graham crackers, and chocolate - so wouldn't it work? Yes, I thought! Oh, I was so wrong. After scooping into it, we found out that the banana cream pudding is actaully the really fake tasting/annoying type of bannana pudding. It was very strong and well, just not good at all! So, it turns out that my birthday dessert for him was exactly the opposite of his dessert for me. His for me was yummy and ugly. Mine for him was pretty (although the picture above didn't turn out so well) and nasty tasting! Now, anyone who knows me knows that I care alot about the look of stuff, so I was actually okay with this!

Okay, guess that was about it for his birthday celebration. If you'd like to see more photos of this tablescape and other birthday themes, please visit the birthday tablescapes area of my site. And for other creative tablescape ideas including information on how to submit your own creative ideas, click here.

Oh yes ... I've recently put together my Valentine's Day tablescape. A few tablescape ideas are already added, please check back for more soon!

Basic Cheddar Fondue

Ingredients:
2 cups milk
1 tablespoon worcestershire sauce
2 teaspoons ground dry mustard
1 clove garlic, peeled and crushed
3 tablespoons all-purpose flour
6 cups shredded cheddar cheese
Dippings such as apples, cauliflower, bread

Directions:
In a medium saucepan over low heat, mix together milk, worcestershire sauce, dry mustard, garlic and flour. Heat until almost boiling. Gradually stir in cheddar cheese. Continue heating until all the cheese has melted. Keep the mixture warm and melted in a fondue dish.

Coq Au Vin

Ingredients:
2 cups vegetable stock
2 cups burgundy wine
1/2 cup diced mushrooms
1 tablespoon garlic, minced
2 green onions, sliced
2 cubes knorr vegetable bouillion cubes

Directions:
Heat vegetable stock in fondue pot until it begins to simmer.
Add all other ingredients, bring to simmer.
Place individual pieces of desired meat or veggies on fondue fork and put in pot until correct temperature has been reached. Lobster and shrimp may take 1 minute while beef and pork will take several minutes.
Vegetables such as mushrooms, broccoli, and red potatoes can also be diced and placed into pot. Remove with spoon once tender.

Tuesday, January 22, 2008

Birthday Tablescape Ideas Cont.


I have just ran across a product that I thought would be perfect to share with my readers. While browsing the web this weekend, I ran across the above Birthday Cake Cookies. Aren't they darling? I so wish that I had known about these before creating my January Birthday Tablescape. Just place these birthday cookies in the center of your placesetting and your next party will be unforgettable. They are available from Beau-Coup. Icing available in pink, blue, yellow, lavender, and green. To link to cookies, just click on the photo above! And for those of you who are thinking ahead to other themed parties, they also have other personalized cookies! (See below - click on photo for more information and for more cookie options!)

Happy Entertaining!

Friday, January 4, 2008

January Tablescape - Birthday Themed

January Tablescape
Birthday Themed Tablescape
For more photos, please click here.

Both my husband's and my birthday fall in the month of January (We are exactly 2 weeks apart - mine being two weeks sooner than his.) And my older sister's bday is in January too! Since this is the case, I thought that January would be the perfect month to highlight a birthday themed tablescape. I always get a case of the winter doldrums in January, so I decided to incorporate bright and cheery colors into our January birthday theme. As you can see above, I chose pinks, greens, blues and a tad bit of purple to incorporate into this festive tablescape. To add a touch of "fun" to this grown-up tablescape, I built the table around items that reminded me of childhood birthday parties - pinwheels and party horns. For added texture, a threw some brightly colored yards of shimmery tulle (pink, blue, and green) over a plain white tablecloth. I also scattered colorful buttons for more texture. These little dots of blue, green, and pink really made the table pop!
I'd searched and searched for some fun pinwheels for the focal piece of my birthday tablescape. All I ran across were either too summery looking or just plain 'cheesy'. You know the type I'm talking about - shiny primary colored pinwheels of old. So, I finally gave up and decided to make my own pinwheels out of card stock paper. I then stuck several styles and shapes of these pinwheels into a tin flower urn as this added the perfect height my pinwheel centerpiece.
Once I finished with the pinwheels, I had some extra polka dot scrapbook paper so I decided to make fun placecards out of the left-overs. Just cut and fold. :-)

My fun birthday placesetting includes a colorful party horn (store bought), a cleverly folded white
napkin featuring similar buttons as scattered on the table (napkins are a Crossroads Cottage exclusive), pink shabby chic luncheon plates (the perfect size for a slice of birthday cake), and these lace shabby chic charger plates.

To view more photos of this tablescape, please click here. For an archive of birthday and other themed tablescapes, or for more information on submitting your own ideas, please click here.

Hope you enjoyed this fun and festive birthday theme! And Happy Birthday to all of my fellow January Birthday buddies! To see a list of "ingredients" to pull off a similar birthday tablescape in your home, please see below.

Tablescape Ingredients:
Shimmery Tuille- Hobby Lobby or any fabric store
Colored Buttons - Any fabric or craft store
Party Horns - Party store

Custom Pinwheels - Available at Crossroads Cottage

Fun Party/Button Napkins - A Crossroads Cottage Exclusive
Shabby Chic Luncheon Plates -
Available at Crossroads Cottage
Shabby Chic Charger Plates -
Available at Crossroads Cottage

Secrets to Success:
* If you are low on time and money, but you'd still like your tablescape to look amazing, purchase tulle at a fabric or craft store. (Yes, tulle is the stuff that ballerina skirts are typically made of, but it can be used for so much more!) They make it in lots of fun colors these days - some are even shimmery! Sewing not required. Just throw layers of this over your bare table, or for a more finished look layer these layers over a cloth from your exisisting collection. If you are using colorful tuille, a plain white cloth underneath will really make the tulle pop! Warning: As tulle is highly flammable, please keep clear of flames - including birthday candles!
* If you don't have the time to make pinwheels, but you are looking for a creative and inexpensive birthday party centerpiece, consider wrapping several different sizes of boxes in bright/colorful wrapping paper. Make a gift tower out of them by wrapping boxes with matching ribbon. Even better, if you are the gift giver, wrap your gifts and place them strategically in the center of the table to create your own fun
gift centerpiece!
Other blogs on Birthday Tablescapes:
Birthday Cookie Idea, Fondue Birthday Party